How to install n8n? Complete tutorial for beginners on local deployment and first run


Installing n8n itself isn't hard; the hard part is "will data be lost" after installation. I've seen too many people get it running with one command, use it for a week, delete the container and recreate it, and all workflows are gone—because the data volume wasn't mounted correctly.
This article explains three common installation methods clearly, ordered by "fewest pitfalls": Docker, Docker Compose, npm. After installation you'll have: an n8n you can open in a browser, data stored locally and not lost, and the correct time zone.
Who this is for and what you need before starting
Suitable for people who have never deployed a service, but you need to be able to open a terminal and type commands. Windows, macOS, and Linux all work. This article focuses on Docker because upgrades and migrations are easiest later.
If you just want to try it on someone else's machine and won't use it long-term, jump directly to the npm method in section 3; it runs with two commands, but don't put important data on it.
First decide where to install it
| Method | Suitable for | Advantages | Cost |
|---|---|---|---|
| Docker (single container) | Personal computer, light use | Clean isolation; delete it and it's gone; upgrading only requires replacing the image | Need to learn some Docker |
| Docker Compose | Long-term operation, needs to connect to a database | Configuration is written into files, can be version-controlled, and automatically starts on reboot | One more yaml file to maintain |
| npm global installation | Already has a Node environment, wants to save resources | No container, connects directly to the host, minimal performance overhead | Depends on the system Node version, upgrades easily get messy |
My suggestion: for personal use, choose Docker Compose, don't use a single docker run. The reason is practical—after you get it running with a single command, two months later you definitely won't remember which parameters you set. Compose writes parameters in a file, so when problems occur you can inspect, modify, and back it up.
Check the environment
First confirm whether Docker is installed. Run in the terminal:
docker -vIf you can see the version number (in the form Docker version 29.5.3, build d1c06ef), it means it is installed. Installing Docker Desktop on Windows and macOS includes it; on Linux use Docker Engine.
Then confirm that port 5678 is not occupied. Linux:
ss -lntp | grep 5678macOS or Linux can also use lsof -i :5678. If there is output, it means it is occupied; change to another port, for example -p 5679:5678. On Windows use netstat -ano | findstr 5678。
Method 1: Run it with a single docker run
First create the data volume, then start the container. Do not merge these two steps into one; create the volume separately, and later when you delete and recreate the container, data will not be lost:
docker volume create n8n_data

docker run -d --name n8n
  -p 5678:5678
  -e GENERIC_TIMEZONE="Asia/Shanghai"
  -e TZ="Asia/Shanghai"
  -e N8N_ENFORCE_SETTINGS_FILE_PERMISSIONS=true
  -e N8N_DEFAULT_LOCALE=zh-CN
  -v n8n_data:/home/node/.n8n
  --restart unless-stopped
  n8nio/n8n
Explain clearly what each parameter is doing one by one; these are the places where you will really hit pitfalls:
-d: run in the background. The official documentation gives-it --rm(run in the foreground and delete on exit), which is for trial use. For long-term use, be sure to change it to-d --restart unless-stopped, and the container will start by itself after the server restarts.-p 5678:5678: map port 5678 inside the container to the host. The left side is the host port; just change the left side.GENERIC_TIMEZONE和TZ: set both.TZcontrols the time of system commands in the container,GENERIC_TIMEZONEcontrols which time zone scheduled-type nodes (such as Schedule Trigger) are calculated by. If only one is set, the issue “I set 9 a.m., but it actually ran at 5 p.m.” will occur.-v n8n_data:/home/node/.n8n:The most critical line. The n8n SQLite database, encryption key, and logs are all in this directory. If you do not mount a volume, everything will be gone once the container is deleted.N8N_DEFAULT_LOCALE=zh-CN: the interface defaults to Chinese. Note that n8n's Chinese translation only covers the shell; node parameters are still in English.
After startup, open in the browser http://localhost:5678. The first time, you will be asked to create an administrator account, and the password must be at least 8 characters. This account is stored locally; if you forget it, you can only reset it, so remember it well.
Method 2: Docker Compose (recommended)
Create a directory and put in it docker-compose.yml:
services:
  n8n:
    image: n8nio/n8n:latest
    container_name: n8n
    restart: unless-stopped
    ports:
      - "5678:5678"
    environment:
      - GENERIC_TIMEZONE=Asia/Shanghai
      - TZ=Asia/Shanghai
      - N8N_DEFAULT_LOCALE=zh-CN
      - N8N_ENFORCE_SETTINGS_FILE_PERMISSIONS=true
      - N8N_SECURE_COOKIE=false
    volumes:
      - ./n8n_data:/home/node/.n8n
Then execute in this directory:
docker compose up -dA few notes:
N8N_SECURE_COOKIE=false This line is only needed when “accessing locally via http”. If you have already configured a domain and HTTPS, delete it—having HTTPS enabled while setting false actually reduces security. Many people get a login page that keeps spinning after installing locally, and this cookie setting is what blocks it.
The data directory uses ./n8n_data, which is a folder at the same level as the yml. The advantage is that for backup you can directly package this directory, without having to guess where the Docker volume is hidden.
View logs and determine whether it has started:
docker compose logs -f --tail=50When you see the line with the editor address and version number, that means it has started. Pressing Ctrl+C only exits the logs; the container is still running.
Method 3: npm global install
The instance I use myself is this method; no container, it runs directly on the host. The prerequisite is a Node.js environment; n8n 2.x requires Node 20 or later (this machine is Node 24.21.0).
npm install -g n8n
n8n start
But running it directly like this has a problem: by default, data lands in the current user directory's .n8n, and it stops when you close the terminal. Production environments usually use environment variables to specify the data directory, then use systemd or pm2 to manage it. The key variables actually used by this instance are as follows (change the values to your own):
N8N_USER_FOLDER=/data/n8n
N8N_HOST=127.0.0.1
N8N_PORT=5678
N8N_PROTOCOL=http
N8N_EDITOR_BASE_URL=https://你的域名/
N8N_DEFAULT_LOCALE=zh-CN
N8N_HOST=127.0.0.1 Together with N8N_EDITOR_BASE_URL, it is a common practice to hide n8n behind Nginx and not expose the port directly; I will cover this in detail in the next post when deploying to a server. If you only use it on this machine, set HOST to localhost and that is enough.
What it looks like after installation
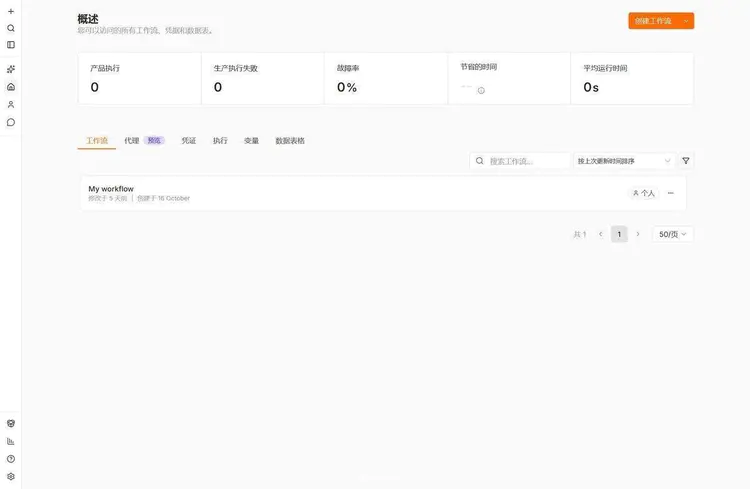
After logging in, you enter the “Overview” page. On the left is the feature navigation; in the middle are tabs such as workflows, executions, and credentials; in the upper right is the “Create Workflow” button.
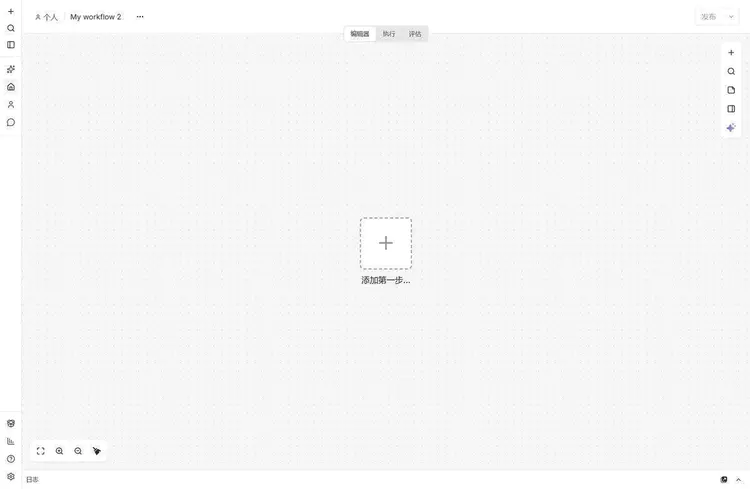
Click “Create Workflow” and you will get an empty canvas with only one line in the middle, “Add first step”:
First workflow: three nodes
Click the plus sign in the middle of the canvas, and the node library will pop up on the right. In the search box, enter manual, select “Manual Trigger (manual trigger)”, and it is the starting point of this flow.
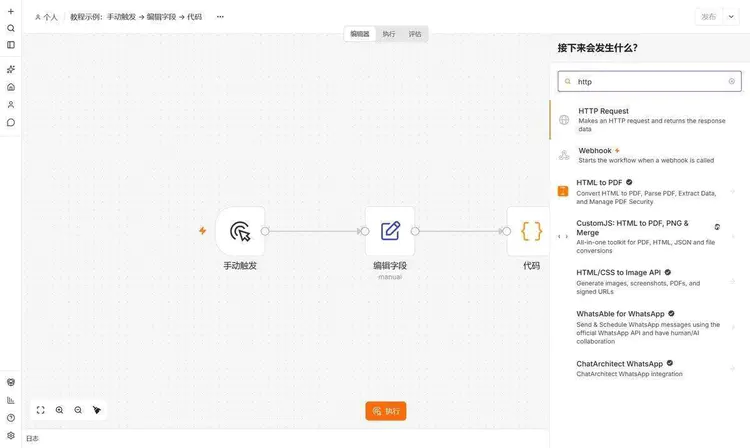
Next, on the small plus sign to the right of the manual trigger node, add an “Edit Fields (edit fields)” node, and write two fields at random, for example city enter “Fuzhou”,temp enter 27. Then add a “Code (code)” node to the right, and paste the following into the code box:
return items.map(item => ({
  json: {
    message: `${item.json.city} 现在 ${item.json.temp} 度`
  }
}));
Finally, click the “Execute” button below the canvas. The three nodes light up in sequence; when they all turn into green check marks, it means the entire chain is connected. At this point, click open any node, and you can see the actual data in the output area on the right.
The purpose of this step is not to learn to write code, but to let you confirm: this setup you installed can run.
What counts as a truly successful installation
Being able to open the UI does not count as success. Go through the following four checks; it counts only if all pass:
- Can open the editor: no errors are reported when accessing it in the browser, and the workflow list is visible.
- Can save: create a new workflow, add any node, wait for it to autosave, then refresh the page, and the content is still there.
- Survives restart:
docker compose restart, refresh again, and the workflow from just now is still there. This is the only way to verify whether the data volume is mounted correctly. - Can execute: run a manual workflow once, the node turns green, and you can click it to see the output data.
The third item is the easiest to skip and also the most critical. If the workflow is gone after a restart, don't doubt n8n; go check -v whether the path after it is written incorrectly, or an anonymous volume was used.
Common errors
The port is already in use.The error message contains port is already allocated. Change the host port, for example -p 5679:5678, then access it using 5679.
The page opens, but login keeps spinning.When accessing locally via http, if N8N_SECURE_COOKIE is the default true, the browser will refuse to write cookies. Set it to false for local testing, and delete this line after HTTPS is configured.
The scheduled task time is incorrect.Only set TZ Did not set GENERIC_TIMEZONE, the schedule node calculates in UTC. Set both to Asia/Shanghai。
The container didn't come up after restart.Forgot to add --restart unless-stopped or the one in the yml restart. After the server restarts, you have to manually docker start n8n。
Pulling the image is very slow or fails.Pulling from Docker Hub over domestic networks often times out; configure an image accelerator and pull again, or use docker pull n8nio/n8n and wait patiently when using it; the image is several hundred MB.
Chinese didn't take effect.N8N_DEFAULT_LOCALE It only affects the default language of new sessions; existing accounts need to change it themselves in settings. And as mentioned earlier, only the UI shell is in Chinese.
Don't rush to expose it to the public internet
After installing, you want to access it from your phone, so you open port 5678 to the public internet—this is the most common mistake. n8n stores the API Keys for your various systems; running exposed on the public internet is like hanging your keys at the front door.
The correct approach is: first use it locally or on the intranet; after confirming you need it long-term, then follow the next article's process to bind a domain, enable HTTPS, use Nginx as a reverse proxy, and only let 127.0.0.1 listen.
Also, after the first login, change the admin password to a strong passphrase; don't use admin123 this kind.
About versions
n8n releases a minor version every week. When writing this article, the stable version listed in the official documentation was 2.44.5, the beta was 2.45.2; the instance I'm running is on 2.43.7, and the UI screenshots are all taken from it.
Recommendation:Don't use latest in production. Pin the image to a specific version number, for example n8nio/n8n:2.44.5, change the number and pull again when upgrading. The consequence of using latest is that one day after a restart, the version has quietly changed, workflow behavior changes accordingly, and troubleshooting becomes very painful.
How to check your own version: after logging in, go to Settings at the bottom of the left sidebar, or run docker exec n8n n8n --version。
Next step
Once installed, spend ten minutes getting familiar with the interface first:n8n interface tour: what the canvas, nodes, and execution records each sayOnce you've familiarized yourself with it, use the setup installed today to type through the three-node example above; hands remember better than eyes.
If you'd rather first understand "why it's worth learning," go back to the previous post:What Is n8n: Beginner Introduction and Use Cases。
References
- Install with Docker (Official)
- Install with npm (Official)
- Environment Variable Configuration (Official)
- Official n8n-hosting Example Repository
Last updated: October 22, 2026. The Docker commands were checked against the official documentation (the stable version listed at the time was 2.44.5); the screenshots were taken from my own machine running 2.43.7.